
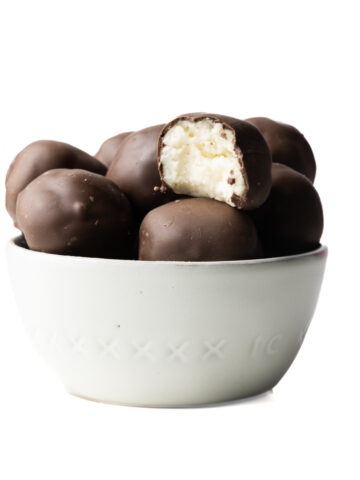
I love a Reese's cup. It's got to be in the top 5 best candies for me. And in my mind the Trader Joes Dark Chocolate Peanut Butter Cups are like fancy, elevated mini Reese's cups. Absolutely nothing against store-bought, but these super easy 3 Ingredient Peanut Butter Cups are inspired by the Trader Joe's version and can satisfy that Reese's cup craving in no time! No oven or special equipment needed!
These Peanut Butter Marshmallow Bars are another super simple no-bake peanut butter treat!

Homemade mini Peanut Butter Cups are more than just dessert! They're perfect for a Halloween party, the best candy for a Christmas stocking or Easter basket (try these Creme Egg Cookies too!), a bonus treat in your holiday cookie boxes, and even makes a lovely Valentine's Day sweet treat or a perfect gift any time of year! If you love Nutella as much as you love peanut butter, be sure to check out these Nutella Cups too!
Why this Recipe Works
It's peanut butter and chocolate - what's not to love?! These from-scratch no-bake Peanut Butter Cups keep it super simple using just three ingredients. Peanut butter is mixed with powdered sugar to sweeten and stiffen it, and then it's enrobed in your favorite chocolate for a sweet and easy treat whenever you need it!
Ingredients and Notes

Peanut Butter - I personally prefer creamy, but crunchy will work too. I generally use Jif, but any brand should work fine, even natural peanut butter. The varying texture of peanut butters will be reflected in these Peanut Butter Cups, so for example, if you use a grittier peanut butter, the Peanut Butter Cups will also be grittier. If it's runnier more than spreadable, you will likely need to increase the amount of powdered sugar added to the filling. If you use a salt free peanut butter or other type of filling, you may need to add a pinch of salt to the filling.
Powdered Sugar - The powdered sugar sweetens the filling, but it also thickens it. A reduction in powdered sugar will impact the texture of the Peanut Butter Cup filling.
Chocolate Melts - Chocolate melting wafers are easy to melt down to a smooth chocolate that can fully surround the filling.
Substitutions and Variations
Peanut Butter - If you have a peanut allergy or are not a fan of peanut butter, these should still be delicious with almond butter, or sunflower butter to make them fully nut-free. The amount of powdered sugar may need to be adjusted to account for the difference in textures. If you want to substitute for Nutella, I'd recommend checking out this Nutella Cups recipe instead!
Chocolate Melts - Chocolate chips or chopped chocolate can also be used. I find that chocolate melting wafers melt better than chocolate chips, but just keep an eye on them and the chips will work great! Dark chocolate, semi-sweet chocolate, or milk chocolate are all delicious! If white chocolate is more your speed, that should work great too - just be careful with melting white chocolate as it seizes easily and becomes unusable. Dairy-free chocolate can be used to make these vegan.
Fillings - For a little extra pizzazz, you could add a banana slice on top of the peanut butter filling before adding the melted chocolate on top. You could also add a small, soft caramel - just make sure it's not too chewy. Frozen dollops of marshmallow fluff or jelly could also add some fluffernutter or PB&J vibes!
Toppings - These copycat Reese's cups are perfect as is, but a topping can add texture, flavor, and visual appeal. Consider topping each cup with a small sprinkle of sea salt, some crushed peanuts, or add a pop of color with your favorite sprinkles.
How to Make this Recipe

Step 1: Combine peanut butter and powdered sugar.

Step 2: Form small balls of the peanut butter mixture and press slightly into thick patties.

Step 3: Melt the chocolate in a double boiler or in the microwave.

Step 4: Spoon a layer of chocolate into the bottom of each cup of a lined mini muffin tin.

Step 5: Place one of the peanut butter patties on top of the melted chocolate and press just slightly, but not enough that it touches the bottom of the cup. It should sit on top of chocolate.

Step 6: Spoon additional chocolate over top of the peanut butter patty, ensuring it fully surrounds the filling. Tap the pan on the counter to smooth out the tops. Let set until fully solid, at least 30 minutes.
Recipe FAQs
Using a smooth, creamy peanut butter will be the best way to ensure the filling in your Peanut Butter Cups is smooth. Natural peanut butter or a more textured peanut butter will make your filling more textured. Make sure the powdered sugar is well combined, too.
Tempering chocolate is a process of melting chocolate that ensures it sets well, and retains the ideal texture and appearance. To do this, ensure the chocolate is fairly evenly sized before melting. If you're using chocolate chips or melting wafers, they will already be evenly sized, but if you're chopping chocolate, you'll want to chop it fairly uniformly. Be sure to not get any water in the chocolate, and use a double boiler to melt it or microwave it in short increments.
This happens when chocolate blooms. Blooming is the result of cocoa butter rising to the surface of the chocolate. This can be caused by improperly tempering your chocolate, drastic temperature changes to the chocolate, or if your chocolate comes into contact with water or humidity. They will still be good, but will just look different and may have a slightly different texture.

Tips & Tricks
Tip #1: To melt chocolate in a double boiler, place a heat safe bowl on top of a saucepan with water about ⅓ way full. Ideally the bowl will not be in direct contact with the water in the saucepan. Heat over medium-low heat, stirring frequently, until the chocolate is fully melted and smooth. Be sure not to get water into the chocolate or it may cause the chocolate to seize, making it unusable.
Tip #2: To melt chocolate in the microwave, start by heating at 50% power for 30 seconds, then stir and continue heating in 15 second increments, stirring thoroughly between each, until melted and smooth.
Tip #3: In a rush, these can be placed in the refrigerator or freezer to set. This could cause the chocolate to bloom, giving it a white speckled look, but they should still taste good!
Tip #4: These DIY miniature Peanut Butter Cups have a harder chocolate shell. To soften the chocolate shell, add 1-2 tablespoons of creamy peanut butter or coconut oil to the chocolate melts and melt into the chocolate. This will give you a softer chocolate. Just be aware that this will make it a little meltier in your hands too.
Tip #5: For full-size homemade Peanut Butter Cups, make the peanut butter into 6 patties instead of 12 and use a full size muffin tin.
Tip #6: To make these without a muffin tin, you can instead use silicone muffin cups or even something like an ice cube tray could work in a pinch - just make sure it's one where you can easily pop them out! You could also use shaped molds like pumpkins, eggs, trees, or hearts for fun themes!
Storage Tips
- These three ingredient Peanut Butter Cups can be stored in an airtight container at room temperature for about 2 weeks.
- Peanut Butter Cups can also be stored in an airtight container in the refrigerator or freezer, but will need to sit out for at least 15-30 minutes before eating or they might be too hard to bite into!
- For best results, wrap the peanut butter cups in plastic wrap, then place in a zip-top freezer bag and ensure it's well sealed. That bag can then be put into a freezer-safe airtight container.
- They may sweat as they come to room temperature, but keeping them in the airtight container while they sit out may help prevent sweating.
Related Recipes

Did you try this recipe? Leave a review below, and tag @flourdeliz on Instagram!
📖 Recipe

Peanut Butter Cups
Equipment
- mini muffin pan
- microwave-safe bowl or double boiler
Ingredients
- ¼ cup creamy peanut butter
- 3 tablespoons powdered sugar
- 2 cups chocolate melting wafers
Instructions
- Combine the peanut butter and powdered sugar until the peanut butter is no longer sticky. You may need a little extra powdered sugar.
- Roll the peanut butter into 12 balls, pressing each slightly flat to form patties. Set aside.
- Line a mini muffin pan with 12 paper liners. (Greasing the pan does not work well for this, so it's really best to use paper liners here.)
- Melt the chocolate in a double boiler over medium-low heat or in the microwave (see notes) until smooth.
- Spoon a small amount of melted chocolate into the bottom of each paper liner.
- Lightly press a peanut butter patty into each cup on top of the melted chocolate - the peanut butter should not touch the bottom of the cup.
- Spoon melted chocolate over top of the peanut butter patty, making sure it gets on the sides of the patty as well, filling the cup to the top. Tap the pan on the counter to smooth out the top of the chocolate.
- Let set for at least 30 minutes, or until chocolate has fully hardened, then enjoy!
Notes
Nutrition
Nutrition information is automatically calculated so should only be used as an estimate. Accuracy is not guaranteed.
This recipe was originally posted on January 16, 2020, but was republished with an updated recipe, new photos, additional information about the recipe in January of 2021 and with new photos, step-by-step instructions, FAQs, and tips and tricks in October of 2024.

Bree says
Loved these! The PB cup recipe that my family continuously request. They’re so much better than the store bought ones. I typically use milk or semi-sweet chocolate when making them but it’s the chocolate and PB filling that makes it all perfect. It’s simple, delicious and easy to make when you’re craving something sweet.
Liz says
Thank you, Bree!! I am so so glad you and your family like them!!! And I love that you change up the chocolates - one of my favorite things about making them is that you can use whatever chocolate you're in the mood for at the time!
Tristan says
Let's support each other, I'll need it more than you. Love your recipes and the website looks nice too.
Thank you for the support btw in IG @bokkallakkob
Kind regards,
Tristan.
Liz says
Thanks so much, Tristan. I'm glad we connected!
Ana says
A delicious recipe and surprisingly easy to pull together! Quite dangerous 🙂
Liz says
I'm so glad you like them!! They really are super dangerous! They're filling my Trader Joes Peanut Butter Cup fix!