
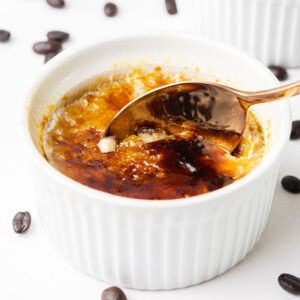
I feel like these days we're all living in a constant state of exhaustion, and while I don't drink caffeine, I will always eat it in my desserts! This 5-ingredient Coffee Crème Brûlée is so creamy and delicious with a sweet and bold coffee flavor. Plus, it takes just 5 ingredients and about 15 minutes to come together, and the hardest part is waiting for it to bake and chill!
Do you prefer mocha over coffee? You'll love these Mocha Hot Chocolate Bombs with espresso, this indulgent Mocha Meringue Pie, and these rich Peppermint Mocha Brownies!

🌟🌟🌟🌟🌟
I gave this a try last week and the flavor of the crème brûlée was out of this world and crazy delicious!
- Bren
🍭 Short & Sweet Recipe Overview
- ⏲️ Time: Takes just 15 minutes of hands-on work, and totals about 4-6 hours, including bake and chill time
- 🛒 Ingredients: Needs just 5 ingredients
- 🍽️ Servings: Makes 4 crème brûlées
- 🥣 Difficulty: Simple and approachable
- 👩🍳 Prep: Can be made ahead, but should be topped just before serving
Summarize and save this content on:
Why You'll Love this Recipe
- Creamy and delicious with a rich coffee flavor.
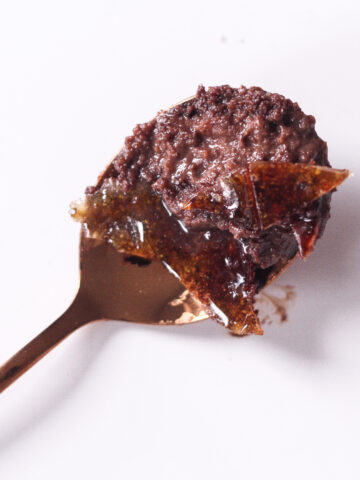
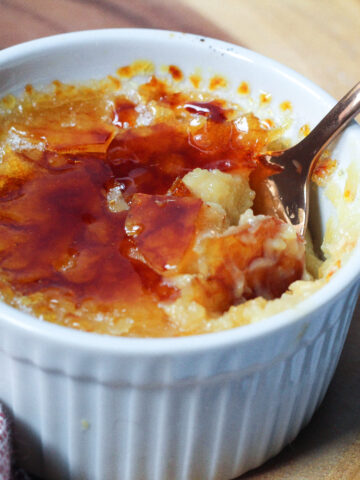
- Feels fancy and is sure to impress. It's so decadent, and it's so satisfying to crack through that crunchy caramelized sugar topping!
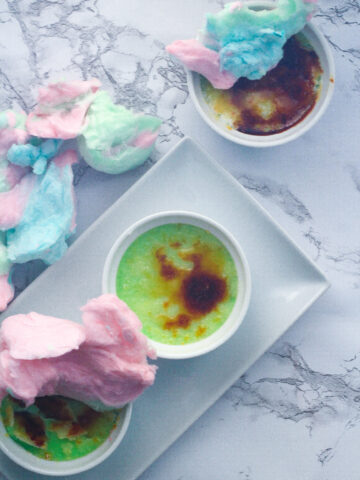
- Perfect for intimate gatherings made in individual, single servings. For more single-serving desserts, check out these Mini Chocolate Molten Lava Cakes with gooey centers and these warm and chewy Mini Skillet Cookies.
- Naturally gluten-free.
Jump to:
Ingredients and Notes

Heavy Cream - Heavy cream gives this Coffee Crème Brûlée a rich, velvety texture and a creamy flavor that balances the sweetness of the custard. Its high-fat content allows for a smooth consistency, ensuring the dessert sets perfectly.
Coffee - Any brewed coffee will work, but I would recommend against using an espresso drink such as a latte, or a coffee drink flavored with syrup. Be sure the coffee is at room temperature when combining it with the cream to prevent the cream from curdling.
Egg Yolks - In addition to contributing to the rich, creamy, and smooth texture of the custard, egg yolks also act as a thickening agent when heated, allowing the custard to set perfectly.
See the recipe card below for full information on ingredients.
Substitutions & Variations
Cold Brew Crème Brûlée - In place of brewed coffee you can use ¼ cup of cold brew or for stronger flavor, ¼ cup of cold brew concentrate.
Espresso Crème Brûlée - For a stronger flavor, in place of the coffee, dissolve one to two teaspoons of instant espresso powder into ¼ cup of hot water, and then let it cool, or use ¼ cup brewed and cooled espresso.
Toppings - Add an extra touch to your Coffee Crème Brûlée by topping it with a chocolate-covered espresso bean, some fruit, or a dollop of whipped cream. This homemade Nutella Whipped Cream would pair perfectly!
How to Make Coffee Crème Brûlée
Find the complete recipe with measurements in the recipe card below.

- Step 1: Heat heavy cream and coffee over low heat until hot, but not boiling. In a separate bowl, combine the egg yolks and brown sugar.

- Step 2: Stir about ¼ of the hot mixture into the egg yolks, then stir the egg yolk mixture into the rest of the hot mixture.

- Step 3: Place 4 ramekins in a 9x13 baking dish and divide the cream mixture evenly among the 4 ramekins. Fill the 9x13 dish with boiling water until the water is about ½ way up the sides of the ramekins.

- Step 4: Bake at 325°F for 40 minutes until the centers are just barely set with an internal temperature between 170°F - 180°F. Cool for at least 15 minutes, until the ramekins have cooled enough to be picked up with your bare hands, then refrigerate for at least 2 hours and up to 2 days.

- Step 5: When ready to serve, sprinkle the top of each crème brûlée with about a half tablespoon of granulated sugar.

- Step 6: Heat with a kitchen torch until slightly browned. Let set, just a few minutes, then serve immediately.
Coffee Crème Brûlée Tips & Tricks
Tip #1: When heating the heavy cream, be sure not to let it boil. It should be heated slowly over low heat while stirring frequently so it doesn't burn. You'll be able to see steam rising from the surface before it begins boiling to indicate that it's time to remove it from the heat. The texture and flavor of the crème brûlée can be impacted if the cream boils.
Tip #2: The process of adding a small amount of the hot mixture to the egg yolks before adding the egg yolks into the hot mixture is called tempering. We temper eggs in order to gradually raise the temperature of the eggs. If the eggs are heated too quickly, they will scramble which we don't want in our Coffee Crème Brûlée!
Tip #3: When filling the baking dish with water, be sure not to get any water in the Coffee Crème Brûlées! Using a kettle can help direct the water into the baking dish without getting into the ramekins. You'll also want to have the baking dish on a trivet because the bottom of the dish will be hot before the crème brûlée goes into the oven.
Tip #4: Ensure your Coffee Crème Brûlée has cooled sufficiently before refrigerating. If you refrigerate the ramekins while they're still hot they can shatter.
Tip #5: When topping the Coffee Crème Brûlée with granulated sugar, you want the layer to be thick enough that you can't see the creme brûlée underneath it, but not too thick or the topping may get a little burnt in order to be able to brûlée all of it!
Tip #6: Keep the torch moving! The brûléed sugar will burn quickly so you don't want to stay in any one spot for too long!
Tip #7: Don't have a kitchen torch? You can use your broiler to brûlée the tops of these custards. Make sure your custard has been chilled in the fridge for several hours, overnight works really well. Preheat your broiler with the oven rack high - you'll want the crème brûlées sitting about 6 inches under the broiler. Let your crème brûlées sit out on the counter for about 10-15 minutes. This is important to prevent your ramekins from going from cold to hot too quickly and shattering. Place the crème brûlées in the oven and watch closely. This should only take a couple of minutes, and the sugar will go from brûléed to burnt very quickly! You can even keep the oven door cracked to watch them.
Recipe FAQs
The water bath ensures the crème brûlées cook evenly, and it prevents the custard from curdling, resulting in a smooth, creamy custard. Without a water bath, the edges are likely to cook faster than the center, and you could end up with either an undercooked center or burnt edges.
Yes! I only drink decaf coffee, so it's usually what I have on hand and ends up being what I use when I make this luxurious dessert! You can run to a coffee shop and get yourself a coffee, setting aside a bit for the crème brûlée (if you get iced, make sure you measure the coffee without ice in it). Or you can brew whatever you have at home. All of it works great!
You can use espresso in place of the coffee for a stronger flavor. Cold brew concentrate can also be used in place of the coffee and may give it a stronger flavor as well. You could also try a coffee extract, but you would need to use a significantly smaller amount and would need to increase the amount of cream accordingly.
Crème brûlée is a specific type of custard. Custards can be made in a variety of ways and enjoyed as a stand-alone dessert, as a pastry filling, or as a pie or tart filling. Crème brûlée is always baked in ramekins and topped with that perfect crunchy caramelized sugar topping.

More Coffee Recipes to try!

👩🍳 If you tried this Coffee Crème Brûlée or any other recipe on my blog, please leave a ⭐⭐⭐⭐⭐ rating in the recipe card below and leave a comment. I love hearing from you!
📖 Recipe
Coffee Crème Brûlée
Equipment
- medium saucepan
- 4 ramekins
- 9x13 baking dish
Ingredients
- 1 ½ cups heavy cream
- ¼ cup coffee brewed and cooled; see notes for cold brew and espresso options
- 5 egg yolks
- ½ cup brown sugar
- 2 tablespoons white sugar for topping
Instructions
- Preheat the oven to 325°F.
- In a saucepan, combine cream and coffee over low heat until just hot, but not boiling, stirring frequently.1 ½ cups heavy cream, ¼ cup coffee
- In a small bowl, beat the yolks and brown sugar until light.5 egg yolks, ½ cup brown sugar
- Stir about a quarter of the cream mixture into the egg mixture, then pour the egg mixture into the cream mixture and stir.
- Place 4 ramekins in a baking dish and divide the creme brûlée mixture evenly among the ramekins.
- Pour boiling water into the baking dish until water is about halfway up the sides of the ramekins. Be careful not to get water in the ramekins.
- Bake for approximately 40 minutes, or until centers are barely set.
- Remove from oven and carefully remove the ramekins from the water bath. Cool for 15-30 minutes, then refrigerate for several hours.
- Once the custard has set, sprinkle the top of each custard with about half a tablespoon of granulated sugar, and torch until the sugar is browned.2 tablespoons white sugar
- Crack and enjoy!
Video
Notes
Nutrition
Nutrition information is automatically calculated so should only be used as an estimate. Accuracy is not guaranteed.
Bren says
Hey Liz! I’ve been looking for a recipe using cold brew instead of using the beans my boyfriend grinds for espresso. Thanks for posting this!! I gave this a try last week and the flavor of the crème brûlée was out of this world and crazy delicious! However, the custard didn’t set as well as I had hoped it would. I didn’t see a temp listed in your recipe. but I baked it in a hot water bath for 40 minutes on 325. What temperature do you recommend?
Liz says
I am so glad you enjoy the flavor, and I'm so sorry I left the temperature out! I will update the post now, but yes, it should be at 325 F. It's definitely tricky because they do need to cool and refrigerate to fully set, so it's hard to tell when you take them out if they're done. I would suggest starting with an oven thermometer if you don't have one to make sure your oven is heating up appropriately. If the oven temp is okay and you've let them refrigerate for numerous hours (I would say at least 4-6, though I tend to go overnight with it) and it still doesn't set, you could reduce the amount a cream a little bit to see if that helps. Let me know how it goes! I'm happy to troubleshoot a bit more if needed!
Bren says
Hey there, Liz! My second attempt was more successful than the first. I honestly think I didn’t heat the cream long enough the first time. I noticed the second time around that the custard was set with a bit of jiggle after baking for 40 minutes. Thanks again for sharing this recipe!
Liz says
I'm so glad it worked!!